I get a lot of questions from clients on how to run the DStv installation wizard. Most people get stuck on Step 4 of 5 due to either incorrect decoder settings or signal problems.
If this sounds familiar then worry no more. Most people actually experience this type of problem.
In this guide, I will show you how to configure the installation wizard. But first, let’s define what the installation wizard is.
Table of Contents
What is the DStv installation wizard?
The DStv installation wizard is a setup assistant that lets you choose your decoder settings and connect to the satellite. The wizard starts automatically when you switch your decoder for the first time. You can also see the wizard if you reset your decoder.
So, knowing how to run the wizard can save you money since you do not have to hire a technician to set up your decoder.
Wizard Settings
When using the installation wizard, you can change the following settings:
- language
- name of the satellite, depending on your country
- type of setup (quick or manual)
- LNB type based on the model of the decoder
Running the installation wizard on the HD decoder
The video below shows how to run the DStv installation wizard when using a normal HD decoder that uses a single or twin LNB. If you do not want to watch the video you can skip to the textual guide after the video.
Time needed: 20 minutes
Here is how to run the DSTV installation wizard on an HD decoder that uses a single LNB.
- Press the blue “DStv button”
- Use the right arrow to go to “Settings.“
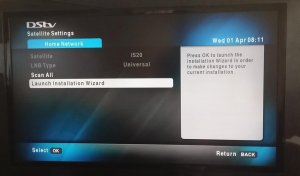
- Scroll down to “Satellite Settings”
- Then choose “Home Network”
- Select “Launch Installation Wizard” then press “OK” on the remote
This will launch the DSTV installation wizard which will first ask you to choose your language.
- Choose the satellite that matches your country.
If you are in South Africa and neighboring countries, then select “IS20”. Use “E36B” if you stay in other parts of Africa.
- Select “Manual Setup” for the HD decoder
Use manual setup if you’re using a single LNB on the satellite dish. Use quick setup if you’re using a smart LNB.
- Set the LNB type to be “Universal”
If you’re in a complex that uses a smart village, then choose “smart TV”. Use the “universal” for a normal setup.
- Select “Scan” then press “OK” on the remote.
If you do not see blue bars, then you do not have a signal. You may need to check your satellite dish alignment or the condition of the LNB.
- Now you have to wait until your decoder finishes scanning
The process of scanning for DSTV channels can take a few minutes.
Running the Wizard on the Explora decoder
Start by following steps 1 to 5 to launch the installation wizard.
- Choose the satellite that matches your country. If you are in South Africa and neighboring countries, then select “IS20”. Use “E36B” if you stay in other parts of Africa.
- Select “Quick Setup” for the Explora decoder
- Then choose “Decoder 1”. Wait until all bars have turned blue.
- Select “Scan” then press “OK” on the remote.
Wait until your decoder finishes scanning the network for channels.
Conclusion
There you have it, that is how you run the wizard. If there is no signal, you can see an error message which reads “This function cannot be performed as the signal strength is low“. You can solve this problem by following the steps in an article I wrote on how to fix a DStv no signal issue.
If you do not want the complications of fixing the signal problem on your own you can contact our accredited DStv installers.
Frequently Asked Questions
The best way to get rid of the DStv installation wizard is to use correct settings for your decoder. In other cases, you will need to fix the signal problem before you can attempt to run the installation wizard. Remember, you will never complete the installation wizard if your decoder is not receiving good signal from the satellite dish.
This error message means that you either have incorrect settings or there is no signal coming from the satellite dish. Check if your cables connections and satellite dish alignment.